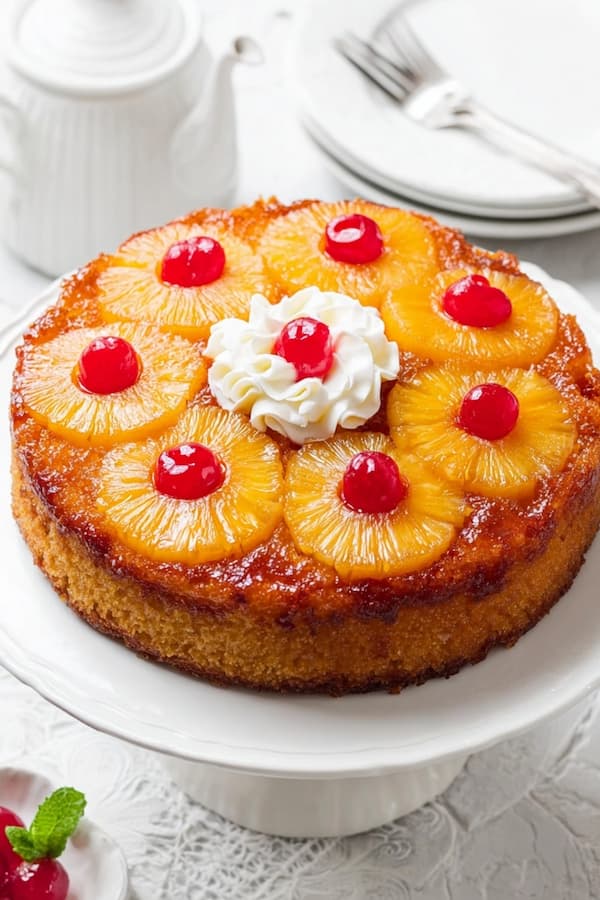
Pineapple upside-down cake is a classic dessert that looks like a work of art but is actually very simple to assemble. The magic happens in the bottom of the pan, where butter and brown sugar melt together to create a natural caramel glaze for the fruit.
When you flip the cake over, you are rewarded with a moist sponge topped with golden, caramelized rings.
Ingredients
This recipe serves 8 people and is best enjoyed warm, right after it has been flipped.
- 1/2 cup unsalted butter, melted (for the topping)
- 3/4 cup packed light brown sugar
- 1 can (20 ounces) pineapple slices in juice, drained
- 8 to 10 maraschino cherries
- 1.5 cups all-purpose flour
- 1 cup granulated white sugar
- 1.5 teaspoons baking powder
- 1/2 teaspoon salt
- 1/2 cup unsalted butter, softened (for the cake)
- 2 large eggs
- 1/2 cup milk
- 1 teaspoon vanilla extract
The Concept
The beauty of this cake is that the decoration is built into the pan before the batter even goes in. Instead of frosting a cake after it cools, you are creating a fruit-and-sugar floor that becomes the ceiling once the bake is finished.
It is a vintage recipe that has stayed popular for decades because the juice from the pineapple seeps into the sponge, keeping it incredibly soft.
Using a cast-iron skillet or a heavy round cake pan is the best way to get an even caramelization. You want the sugar and butter to bubble together until they form a thick syrup that coats the pineapple rings.
The cherries are not just for color; they add a little pop of sweetness that balances the tang of the
Sugar Floor
Start by preheating your oven to 350°F. Take your melted butter and pour it directly into the bottom of a 9-inch round cake pan or a cast-iron skillet. Swirl it around so the bottom and sides are coated. Sprinkle the brown sugar evenly over the butter.
Use your fingers or a spoon to press it down into a flat layer. This is the base of your caramel.
Fruit Pattern
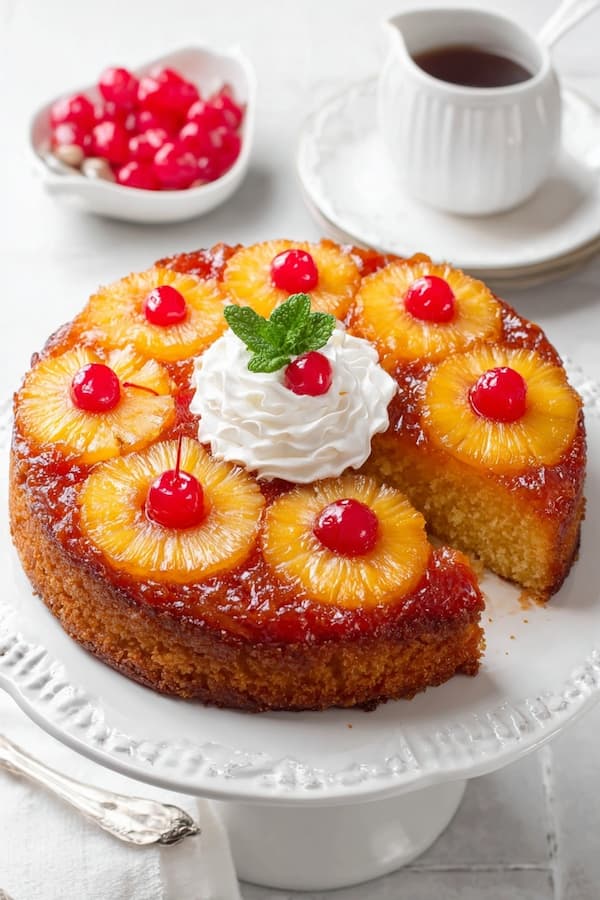
Lay the pineapple slices on top of the brown sugar. You can usually fit one in the center and six around the edges. If you have extra space, you can cut slices in half to fill the gaps. Place a maraschino cherry in the center of each pineapple ring. The fruit should be snug but not overlapping.
This pattern is what people will see when you flip the cake, so take a second to make it look neat.
Creamy Mix
In a large bowl, beat the softened butter and granulated sugar together until the mixture looks pale and fluffy. Add the eggs one at a time, beating well after each addition. Stir in the vanilla extract. In a separate bowl, whisk your flour, baking powder, and salt together.
This ensures the leavening agent is distributed so the cake rises evenly without any big holes or flat spots.
Batter Fold
Add half of the dry ingredients to the butter mixture and stir gently. Pour in the milk, then add the rest of the flour. Stir only until the white streaks of flour disappear. Over-mixing at this stage will make the cake tough and bready.
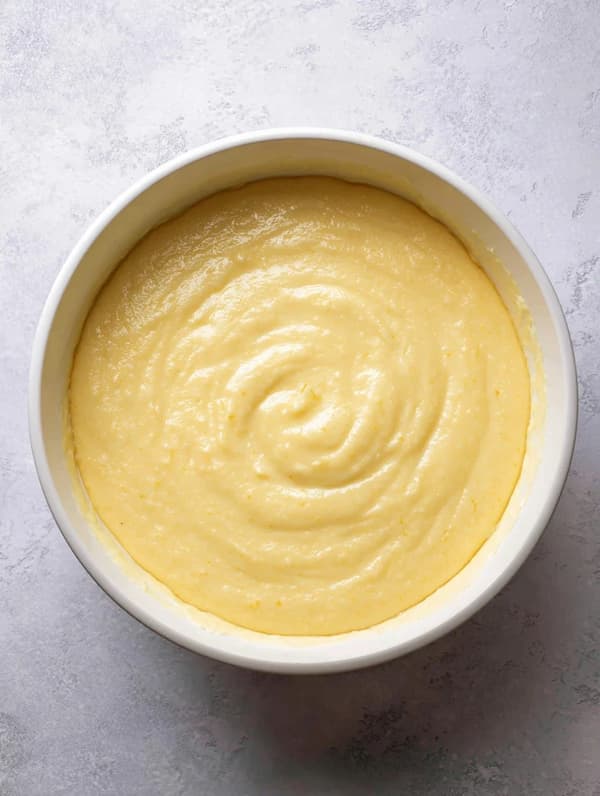
You want a thick, smooth batter that can support the weight of the fruit without letting the caramel juices rise too far up the sides of the cake.
Slow Bake
Spoon the batter carefully over the pineapple slices. Use a spatula to spread it to the edges, being careful not to move the fruit underneath. Bake for 40 to 45 minutes. You will know it is done when a toothpick inserted into the center comes out clean.
The top of the cake should be a deep golden brown and feel springy when you touch it.

The Flip
This is the most important part of the entire process. Let the cake rest in the pan for exactly ten minutes. If you flip it too soon, the caramel will be too thin and run everywhere. If you wait too long, the sugar will cool and stick to the pan, leaving the fruit behind.
Place a large plate over the top of the pan and, using oven mitts, quickly flip the whole thing over. Give the bottom of the pan a few firm taps before lifting it off.
Better Fruit
For a “top-notch” flavor, I recommend saving a little bit of the pineapple juice from the can. Instead of using a full 1/2 cup of milk in the batter, use 1/4 cup of milk and 1/4 cup of the pineapple juice.
This intensifies the tropical flavor and makes the crumb of the cake even more tender. It is a small change that makes the cake taste more “homemade” and less like a boxed mix.
If you want to get really fancy, you can use fresh pineapple. Just make sure the slices are uniform in thickness so they cook at the same rate. Fresh pineapple is less sweet than canned, so you might want to add an extra tablespoon of brown sugar to the bottom of the pan to compensate.
Common Pitfalls
The biggest mistake people make is using a pan that is too shallow. As the butter and sugar melt, they bubble up. If your pan is too full, that sticky syrup will spill over onto the bottom of your oven and create a lot of smoke. Always leave at least an inch of space at the top of the pan, or place a baking sheet on the rack below to catch any drips.
Another issue is the “soggy bottom.” This happens if you leave the cake in the pan for too long after baking. The steam from the hot cake will collect under the fruit and turn the caramel into a watery mess. Stick to the ten-minute rule for the perfect balance of a set glaze and a clean release.
Can I Use A Different Type Of Fruit For This Recipe?
Yes, the “upside-down” method works for almost any fruit that holds its shape when heated. Peaches, apples, and even halved plums are excellent substitutes. If you use apples or pears, I recommend adding a teaspoon of cinnamon to the brown sugar layer to complement the fall flavors. The technique remains exactly the same: butter and sugar on the bottom, fruit on top, followed by the batter.
How Do I Store This Cake If I Have Leftovers?
Because of the fresh fruit and the sugar glaze, this cake stays moist for a long time. You can keep it at room temperature under a cake dome for about two days. If you need to keep it longer, put it in the refrigerator.
Just keep in mind that the cold will make the butter in the cake firm up, so it is best to let a slice sit on the counter for twenty minutes or give it a quick five-second zap in the microwave before eating it.
Final Thoughts
Pineapple upside-down cake is a reminder that some of the best recipes are the ones that have been around the longest. It is a reliable, comforting dessert that looks much more difficult to make than it actually is. It brings a bright, sunny feeling to the table regardless of the season.
Whether you are making it for a Sunday dinner or a casual birthday, it is a cake that people always remember. The combination of the warm caramel and the tropical fruit is hard to beat. Take your time with the fruit layout, don’t forget the ten-minute timer for the flip, and enjoy every bite.
Ingredients
Method
- Start by preheating your oven to 350°F. Take your melted butter and pour it directly into the bottom of a 9-inch round cake pan or a cast-iron skillet. Sprinkle the brown sugar evenly over the butter. Use your fingers or a spoon to press it down into a flat layer. This is the base of your caramel.
- Lay the pineapple slices on top of the brown sugar. You can usually fit one in the center and six around the edges. If you have extra space, you can cut slices in half to fill the gaps. Place a maraschino cherry in the center of each pineapple ring.
- In a large bowl, beat the softened butter and granulated sugar together until the mixture looks pale and fluffy. Add the eggs one at a time, beating well after each addition. Stir in the vanilla extract.
- In a separate bowl, whisk your flour, baking powder, and salt together.
- Add half of the dry ingredients to the butter mixture and stir gently. Pour in the milk, then add the rest of the flour. Stir only until the white streaks of flour disappear. Over-mixing at this stage will make the cake tough and bready.
- Spoon the batter carefully over the pineapple slices. Use a spatula to spread it to the edges, being careful not to move the fruit underneath. Bake for 40 to 45 minutes.
- Let the cake rest in the pan for exactly ten minutes. Place a large plate over the top of the pan and, using oven mitts, quickly flip the whole thing over. Give the bottom of the pan a few firm taps before lifting it off.