Few desserts are as fun to make — or to eat — as chocolate cake pops. They’re rich, bite-sized, and endlessly customizable, with that perfect balance between a fudgy center and a crisp chocolate shell.
The best part? You don’t need to bake a thing. This no-bake recipe shows you how to make chocolate cake pops from scratch — using simple ingredients, no oven, and no fancy tools. Whether you’re making them for a party, as gifts, or just for a cozy weekend treat, these cake pops deliver all the chocolatey satisfaction you could ask for.
Why You’ll Love This Recipe
Cake pops are one of those desserts that feel special even though they’re easy to make. There’s something satisfying about dipping each pop in melted chocolate and watching it set into a smooth, glossy shell.
This version skips the baking — instead of starting with a cake, we’ll make a quick, fudgy base using crushed cookies, cocoa, and frosting. It tastes just like rich chocolate cake but takes a fraction of the time.
And because it’s no-bake, you can make them anytime — no need to heat up the oven or worry about baking times. Just mix, roll, dip, and chill.
Ingredients
Makes about 20 cake pops
For the cake base:
- 2 cups chocolate sandwich cookies (like Oreos), crushed into fine crumbs
- 3 tablespoons cocoa powder
- 3 tablespoons melted butter
- 3–4 tablespoons chocolate frosting (store-bought or homemade)
- 1 teaspoon vanilla extract (optional)
For coating:
- 1 ½ cups chocolate chips or candy melts (dark, milk, or white)
- 1 tablespoon coconut oil or shortening (for smooth dipping)
Make the Chocolate Base
Start by crushing your cookies. The easiest way is to place them in a food processor and pulse until you get fine crumbs. If you don’t have one, just seal them in a zip-top bag and crush with a rolling pin.

Transfer the crumbs to a large mixing bowl. Add cocoa powder, melted butter, and vanilla extract. Stir until combined.
Next, add the frosting one spoonful at a time, mixing after each addition. You’re looking for a consistency that’s soft and slightly sticky — like cookie dough. If it feels too dry, add another tablespoon of frosting.
It should hold together easily when you press it between your fingers.
Shape the Cake Balls
Scoop out about 1 tablespoon of the mixture at a time and roll it into smooth balls using your hands. Try to keep them all roughly the same size so they set evenly.
Place the rolled cake balls on a parchment-lined baking sheet. Once done, refrigerate them for 15–20 minutes, or pop them in the freezer for 10 minutes to firm up.
This step helps the cake balls hold their shape when dipped in chocolate later.
Melt the Chocolate
In a microwave-safe bowl, add your chocolate chips and coconut oil. Microwave in 20-second bursts, stirring between each until smooth and melted.
You can also melt the chocolate using a double boiler on the stove if you prefer more control over the temperature.

The chocolate should be silky and pourable, not too thick. If it starts to stiffen, add a tiny bit more oil to loosen it.
Insert the Sticks
Take your chilled cake balls out of the fridge. Dip the tip of each cake pop stick into the melted chocolate (just about ¼ inch deep), then insert it into the center of each cake ball.
This small step helps anchor the stick — the chocolate acts like glue when it hardens.
Once all sticks are in place, return the tray to the fridge for 10 more minutes to let them firm up again.
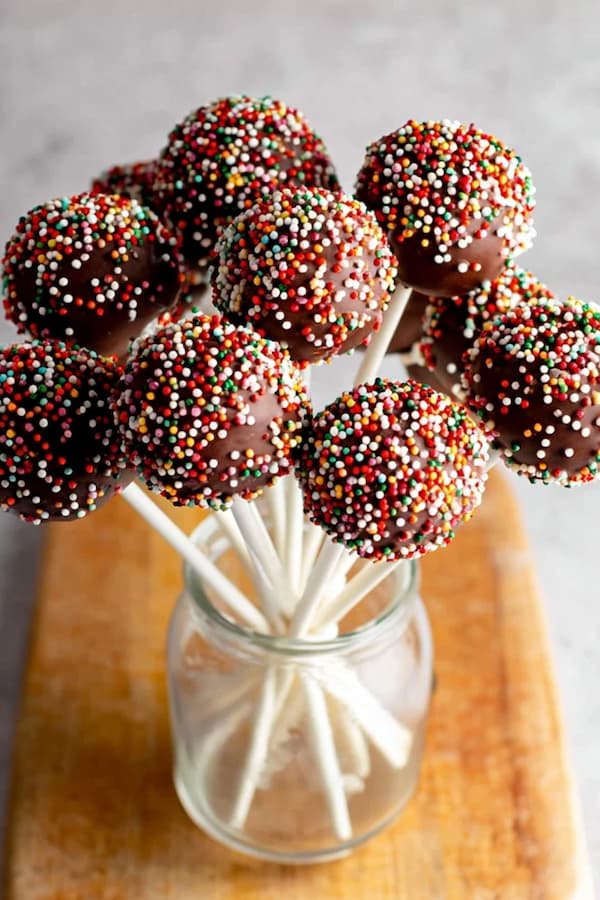
Dip and Decorate
Now comes the fun part — dipping and decorating!
Holding each cake pop by the stick, dip it gently into the melted chocolate, making sure it’s fully coated. Tilt the bowl if needed and rotate the pop to help cover it evenly.
Once coated, lift it out and gently tap the stick against the bowl to let excess chocolate drip off.
Before the coating sets, you can sprinkle toppings like crushed nuts, sprinkles, or coconut. If you want to drizzle with white chocolate, let the coating set first.
Place each finished pop upright in a foam block or stand them stick-up in a glass to dry. If you don’t have a stand, just lay them down carefully on parchment paper.

Chill Until Set
Once all your pops are coated, refrigerate them for 20–30 minutes until the chocolate shell is completely firm.
You’ll know they’re ready when they look glossy and feel solid to the touch.
And that’s it — your chocolate cake pops are done!
How to Serve Them
These no-bake cake pops are perfect for just about any occasion: birthdays, holidays, or even as edible gifts. You can serve them as-is, or wrap them individually in cellophane with a ribbon for a sweet homemade touch.
They’re great chilled, but you can also let them come to room temperature before serving for a softer, truffle-like texture.
Why This Recipe Works
This no-bake version is quicker, simpler, and just as delicious as the traditional kind. The cookie base gives it that signature cake-like flavor and texture without any baking. The cocoa adds depth, while the frosting binds everything together with richness.
The result? A fudgy, melt-in-your-mouth center with a crisp chocolate shell — the perfect bite-sized indulgence.
And because there’s no oven involved, you can make them any time of year — even on a hot summer day.
Tips for Perfect Cake Pops
- Use good-quality chocolate. It makes a big difference in flavor and texture.
- Don’t rush the chilling steps. Firming the cake balls before dipping keeps them from falling apart.
- Work in small batches. Keep half the cake balls in the fridge while you dip the others.
- Thin the chocolate if needed. Add a little extra coconut oil if your chocolate feels too thick.
- Get creative. You can flavor the filling with espresso powder, orange zest, or even a spoon of peanut butter.
Variations
Once you master the base recipe, you can experiment with endless flavors:
- Mint Chocolate Cake Pops: Add a few drops of peppermint extract to the mixture.
- Peanut Butter Chocolate Pops: Swap some frosting for creamy peanut butter.
- Cookies and Cream: Mix crushed sandwich cookies into white chocolate coating.
- Mocha Pops: Stir espresso powder into the base for a coffee-chocolate kick.
These variations keep things fun and allow you to tailor the flavor to your mood or the occasion.
Shelf Life
Cake pops store beautifully, making them great for make-ahead desserts.
- Refrigerator: Store in an airtight container for up to 5 days.
- Freezer: Freeze for up to 2 months. Thaw in the fridge overnight before serving.
- Room temperature: If it’s cool indoors, they can sit out for a few hours.
Just keep them away from direct heat or sunlight — chocolate and warm weather don’t mix well.
Why You’ll Keep Coming Back to This Recipe
These no-bake chocolate cake pops are pure joy to make — a mix of creativity, fun, and a little bit of chocolate therapy. They’re easy enough for beginners but impressive enough to serve at any event.
They’re also a great recipe to make with kids — rolling, dipping, and decorating is half the fun.
Every bite is sweet, smooth, and satisfying — a perfect combination of chocolatey richness and playful presentation. Whether you’re gifting them or keeping them all to yourself (no judgment here), they never fail to bring smiles.
Related Questions
1. Can I Make These Without Frosting?
Yes! You can use cream cheese or Nutella instead — both work beautifully as a binder and add a delicious twist to the flavor.
2. How Do I Prevent the Cake Pops from Cracking?
Make sure your melted chocolate isn’t too hot when you dip the cold cake balls. Room-temperature chocolate and slightly chilled cake balls are the best combo for a smooth finish.
A Treat That’s Simple, Sweet, and Always a Hit
Making chocolate cake pops from scratch (no bake) is one of those small joys that turns an ordinary day into something a little special. The process is easy, a bit messy in the best way, and the results are absolutely worth it.
Each pop is a perfect mix of fudgy center and crisp shell — the kind of dessert that disappears fast. Once you make them, you’ll wonder why you ever thought you needed to bake to create something so good.
So melt that chocolate, grab your sprinkles, and get ready to make something that’s as fun to make as it is to eat.
Ingredients
Notes
- Use good-quality chocolate. It makes a big difference in flavor and texture.
- Don’t rush the chilling steps. Firming the cake balls before dipping keeps them from falling apart.
- Work in small batches. Keep half the cake balls in the fridge while you dip the others.
- Thin the chocolate if needed. Add a little extra coconut oil if your chocolate feels too thick.
- Get creative. You can flavor the filling with espresso powder, orange zest, or even a spoon of peanut butter.