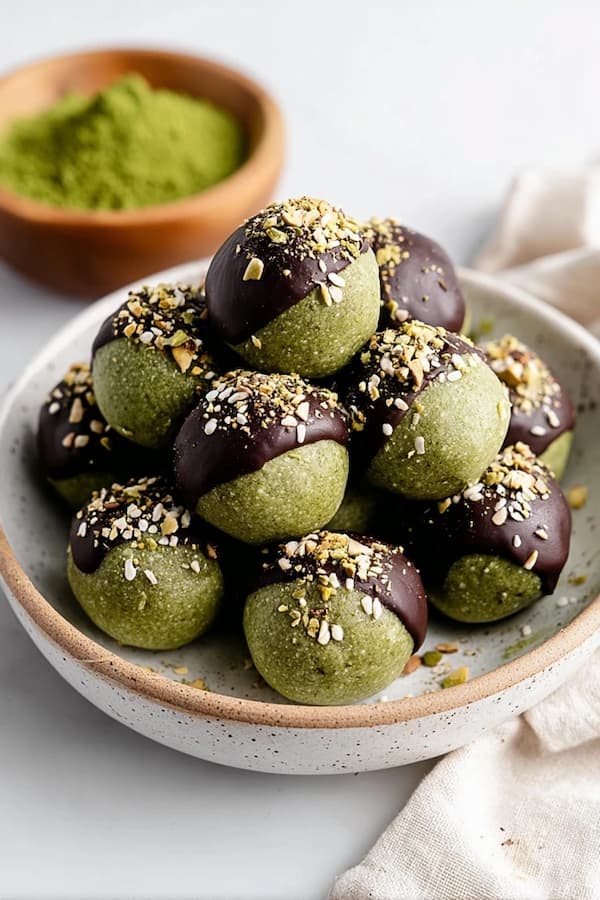
Matcha protein bliss balls are a smart way to get a quick burst of energy and a high-protein hit without any baking. These bite-sized treats combine the earthy flavor of Japanese green tea with the sweetness of maple syrup and the creamy texture of nut butter.
They are a perfect fit for your busy blogging schedule at MushroomSalus or The Daily Bakes.
Ingredients
Yields: 16 balls (about 4 servings)
- 1 cup blanched almond flour
- 1/2 cup vanilla protein powder
- 1 tablespoon ceremonial grade matcha powder
- 1/4 cup creamy almond butter (or cashew butter)
- 3 tablespoons maple syrup
- 1 tablespoon melted coconut oil
- 1 teaspoon vanilla extract
- 1/4 teaspoon salt
- 2 tablespoons shredded coconut (for rolling)
- 1 extra teaspoon matcha powder (for dusting)
Sift the Green
Start by placing your almond flour, vanilla protein powder, and matcha powder into a large mixing bowl. It is very helpful to use a fine-mesh sieve for the matcha powder because it tends to form small, stubborn clumps that are hard to stir out later.
Use a whisk to combine these dry ingredients until the entire mixture turns a soft, uniform shade of pale green. This ensures that the caffeine and antioxidants from the tea are spread evenly throughout every single ball you make.
Melt the Fats
In a small, microwave-safe dish, combine your almond butter and coconut oil. Heat them for about twenty seconds until the oil is liquid and the nut butter is easy to stir. Mixing these two together first makes it much easier to incorporate them into the dry flour later on.
If your almond butter is already very runny from a fresh jar, you might only need ten seconds of heat to get it to the right consistency for blending.
Sweeten the Base
Add the maple syrup and vanilla extract directly into the warm oil and nut butter mixture. Use a small spoon to stir them until the liquid looks glossy and smooth. This step creates a fragrant, sweet syrup that will act as the “glue” for your bliss balls.
Using a liquid sweetener like maple syrup is better than granulated sugar because it keeps the snacks moist and prevents them from feeling gritty when you bite into them.
Merge the Mix
Pour the sweet liquid mixture over your green dry ingredients in the large bowl. Use a sturdy spatula to fold the two together, pressing down as you go to make sure the flour fully absorbs the liquids.
At first, it might look like there isn’t enough moisture, but keep stirring for a minute or two. The dough should eventually come together into a thick, slightly oily green ball that pulls away cleanly from the sides of your mixing bowl.
Check the Feel
Take a small piece of the dough and squeeze it in the palm of your hand. If the dough crumbles apart, add one extra teaspoon of maple syrup or water to the bowl and mix again. If it feels too sticky to roll, add another tablespoon of almond flour to help dry it out.
The goal is a texture that feels like damp sand or play-dough—firm enough to hold a shape but soft enough to be chewed easily.
Scoop the Rounds
Use a small cookie scoop or a measuring tablespoon to portion out the dough so every ball is the same size. Roll each portion between your palms using a gentle circular motion until it is perfectly round.
Consistency is important here because it makes the final batch look professional on your food blog photography. Place the finished rounds on a plate or a small baking sheet lined with parchment paper so they don’t stick to the surface.
Coat the Surface
Prepare two small bowls, one with shredded coconut and one with a little bit of extra matcha powder. Roll half of your bliss balls in the coconut and the other half in the matcha powder to create a beautiful contrast of colors. This double-coating makes them look like expensive truffles from a boutique bakery. If the coating isn’t sticking well, you can lightly dampen your hands with a tiny bit of water before rolling the balls one last time.
Chill to Set
Place the plate of finished balls into the refrigerator for at least thirty minutes before you try to eat them. The coconut oil in the recipe will firm up as it cools, which gives the snacks a much better “snap” and prevents them from being too soft.
Chilling also allows the earthy matcha flavor to settle and balance out with the sweetness of the vanilla protein powder. Once they are firm, you can transfer them to a glass jar for long-term storage.
Tips to Make it Perfect
- Use High-Grade Matcha: Ceremonial grade matcha has a much brighter green color and a smoother taste than culinary grade, which can sometimes be bitter.
- Room Temp Syrup: Make sure your maple syrup is at room temperature so it doesn’t cause the melted coconut oil to seize up and clump.
- Sift Everything: Protein powder can sometimes be lumpy; sifting it with the matcha ensures a perfectly smooth texture in every bite.
- Wet Your Hands: If the dough is sticking to your palms while rolling, a tiny bit of water on your skin will make the process much cleaner.
How long do these bliss balls stay fresh?
Since these are made with shelf-stable ingredients like almond flour and nut butter, they last a long time. You can keep them in an airtight container in the refrigerator for up to two weeks.
Can I use a different type of protein powder?
You can use almost any type of protein powder, but vanilla or plain unflavored versions work best to let the matcha shine. If you use a plant-based protein like pea or hemp, you may need to add an extra tablespoon of maple syrup because plant proteins tend to absorb more moisture than whey.
Avoid using chocolate-flavored protein, as the dark color will ruin the vibrant green look of the matcha and the flavors don’t always pair well together.
Ingredients
Method
- Whisk the almond flour, vanilla protein powder, and matcha powder together in a large bowl. Using a sieve for the matcha is highly recommended to prevent any small, bitter clumps from forming in the dough.
- In a separate small dish, stir together the almond butter, maple syrup, melted coconut oil, and vanilla extract. Ensure the mixture is smooth and glossy before you move on to combining the wet and dry ingredients.
- Pour the liquid mixture over the dry green powder and fold them together with a spatula. Press the mixture firmly until it forms a thick, cohesive dough that holds its shape when squeezed in your hand.
- Scoop out small portions of the dough and roll them between your palms to create even, round spheres. If the dough is sticking to your skin, lightly dampen your hands with a tiny bit of water to make the rolling process easier.
- Roll the finished balls in shredded coconut or a light dusting of extra matcha powder for a professional look. Place them in the refrigerator for at least thirty minutes to allow the coconut oil to firm up and set the texture.
Notes
- Use High-Grade Matcha: Ceremonial grade matcha has a much brighter green color and a smoother taste than culinary grade, which can sometimes be bitter.
- Room Temp Syrup: Make sure your maple syrup is at room temperature so it doesn’t cause the melted coconut oil to seize up and clump.
- Sift Everything: Protein powder can sometimes be lumpy; sifting it with the matcha ensures a perfectly smooth texture in every bite.
- Wet Your Hands: If the dough is sticking to your palms while rolling, a tiny bit of water on your skin will make the process much cleaner.