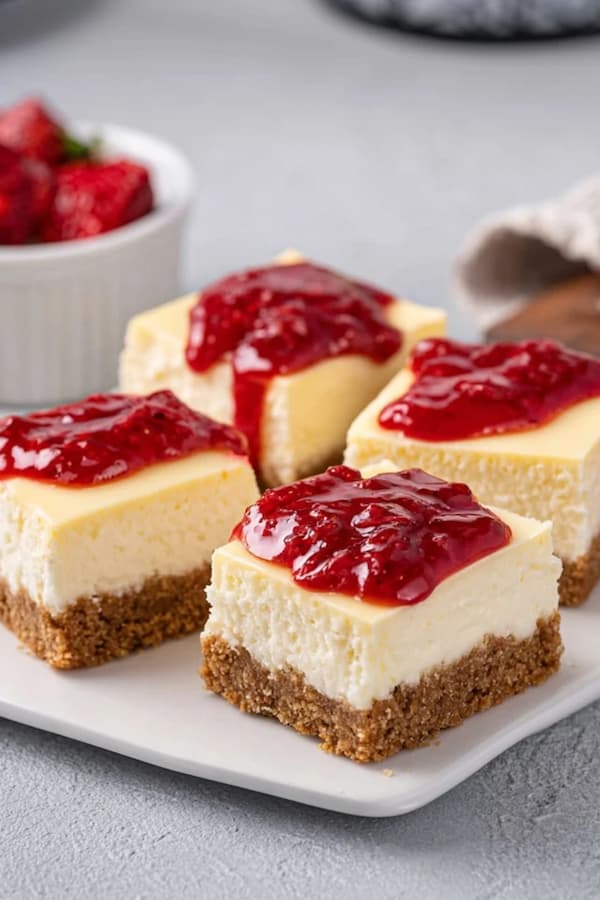
No-bake strawberry cheesecake bars are the perfect solution for satisfying your sweet tooth without ever turning on the oven. These bars feature a buttery graham cracker crust topped with a silky, cream cheese filling and a vibrant layer of fresh berries.
They are a reliable dessert for summer potlucks or weekend treats because they stay firm, cool, and refreshing.
Ingredients
This recipe makes 16 squares, providing enough to share at a gathering or keep in the fridge for a few days of treats.
- 2 cups graham cracker crumbs
- 1/2 cup unsalted butter, melted
- 16 ounces cream cheese, softened to room temperature
- 1 cup powdered sugar
- 1 teaspoon vanilla extract
- 1 1/2 cups heavy whipping cream, cold
- 1 pound fresh strawberries, hulled and sliced
- 1/4 cup strawberry jam (optional for the topping)
Crust Base
A top-notch cheesecake bar starts with a solid foundation. You want to mix your graham cracker crumbs with the melted butter until the texture looks like wet sand.
If the crumbs are too dry, the bars will crumble when you try to lift them out of the pan. If they are too greasy, the crust will be hard to bite through once it is chilled.
Press the mixture firmly into the bottom of a 9×9 inch square baking pan. I recommend lining the pan with parchment paper first, leaving a little overhang on the sides. This acts as a handle so you can lift the entire block of bars out later for clean slicing.
Use the bottom of a flat measuring cup to pack the crumbs down into a tight, even layer. Put the pan in the freezer for fifteen minutes to set while you work on the filling.
Cream Whip
The secret to a light and airy no-bake cheesecake is how you handle the heavy cream. In a cold bowl, beat the heavy whipping cream until it forms stiff peaks. You want it to be thick enough that it holds its shape when you lift the whisk.
Set this aside for a moment. This whipped cream provides the “lift” that replaces the eggs used in baked versions.
In a separate large bowl, beat the softened cream cheese, powdered sugar, and vanilla extract. You need the cream cheese to be very soft so that you don’t end up with tiny white lumps in your dessert. Blend until the mixture is completely smooth and looks like a thick frosting.
Using simple and direct ingredients like these ensures the flavor is clean and the texture is velvety.
Gentle Fold
Now you need to combine the two mixtures without losing the air you just whipped into the cream. Add about a third of the whipped cream to the cream cheese bowl and stir it in to lighten the base.
Then, gently fold in the rest of the whipped cream using a rubber spatula. Use a slow, circular motion, lifting from the bottom to the top.
Do not use an electric mixer for this part. If you are too aggressive, you will deflate the cream and your cheesecake bars will be runny instead of fluffy.
You are looking for a uniform, cloud-like consistency. This step is a hallmark of a professional-grade dessert and ensures that your bars have a luxurious feel that your blog readers will love.
Smooth Spread
Take your chilled crust out of the freezer and pour the cheesecake filling over the top. Use an offset spatula or the back of a large spoon to spread the cream into every corner. You want the top to be as flat and smooth as possible.
This creates the perfect canvas for the strawberry layer you are about to add.
Tap the pan gently on the counter a few times. This helps settle the filling and removes any large air bubbles that might be trapped against the crust. This attention to detail ensures a professional-grade look once the bars are sliced.
Since you aren’t baking these, the “set” depends entirely on the stability of your cream and the cold temperature of your fridge.
Berry Layer
Now it is time for the fruit. Arrange your sliced strawberries in neat rows over the top of the cream cheese filling. You can overlap them slightly to ensure that every square gets plenty of fruit. Using fresh, ripe berries is essential for that vibrant red color and natural sweetness.
If your berries are a bit tart, you can toss them in a teaspoon of sugar before adding them to the top.
To give the bars a glossy, top-notch look, warm up the strawberry jam in a small bowl until it is liquid. Use a pastry brush or a spoon to lightly glaze the tops of the strawberries. This provides a beautiful shine and keeps the berries from drying out while the bars sit in the fridge.
It is a simple trick that makes the dessert look like it came from a high-end bakery.
Cold Set
This is the most important part of the recipe. No-bake cheesecake must have time to firm up. Place the pan in the refrigerator for at least six hours, though overnight is much better. The cold temperature helps the fats in the cream cheese and heavy cream solidify, creating a bar that is easy to slice and hold.
If you try to cut them too early, the filling will stick to your knife and the bars will lose their shape. Patience is a vital part of the process.
Keep the pan level in the fridge so the layers stay even. This long rest also allows the moisture from the cream to soften the crust just enough so that it is easy to cut through without cracking.
Better Slice
When you are ready to serve, use the parchment paper handles to lift the entire block out of the pan and onto a cutting board. To get those clean, professional edges use a very sharp knife. A pro tip is to run the knife under hot water and wipe it dry between every single cut.
The heat from the blade will glide through the cold cream cheese without tearing the strawberries or the crust. Wipe the blade clean after each slice so that no crumbs or cream get smeared on the next bar.
This ensures that every square looks perfect for photography or for serving to guests. It is a small step that makes a massive difference in the final presentation.
Common Pitfalls
The biggest mistake is using cream cheese that is still cold. Cold cheese will never blend smoothly, and you will end up with a grainy texture.
Another issue is not whipping the heavy cream enough. If the peaks are soft or runny, the bars will never set properly and will stay more like a pudding. Always check for those stiff peaks before you stop the mixer.
Finally, avoid using frozen strawberries for the topping.
Frozen berries release a lot of water as they thaw, which will bleed into the white cream and make the dessert soggy. Stick to fresh fruit for the best texture and appearance. Following these simple rules ensures that your no-bake strawberry cheesecake bars are a success every time you make them.
Can I make these bars gluten-free?
Yes, you can easily make this recipe gluten-free by swapping the standard graham crackers for a gluten-free brand. The rest of the ingredients, including the cream cheese, heavy cream, and fruit, are naturally gluten-free.
Just ensure your vanilla extract and powdered sugar are certified if you are cooking for someone with a severe allergy. This simple swap allows you to share this top-notch treat with an even wider audience on your blog.
How do I store the leftovers?
These bars should be kept in an airtight container in the refrigerator. They will stay fresh and delicious for up to three days. Because of the fresh strawberries on top, they are best enjoyed sooner rather than later, as the fruit will eventually start to soften.
If you want to make them further in advance, you can wait to add the strawberry layer until the day you plan to serve them. Do not freeze these bars, as the texture of the cream cheese filling can become grainy once it thaws.
Final Thoughts
No-bake strawberry cheesecake bars are a masterclass in summer simplicity. By focusing on a solid crust, a fluffy filling, and fresh fruit, you can create a top-notch dessert that everyone will enjoy. It is a bright, beautiful, and satisfying treat that requires zero oven time.
Keep your cream cold, your cheese soft, and your knife clean. These simple rules are the key to a successful bar. It is a sweet and creamy combination that will quickly become a favorite for your family and your readers.
Ingredients
Method
- You want to mix your graham cracker crumbs with the melted butter until the texture looks like wet sand. Press the mixture firmly into the bottom of a 9×9 inch square baking pan.
- I recommend lining the pan with parchment paper first, leaving a little overhang on the sides. This acts as a handle so you can lift the entire block of bars out later for clean slicing.
- Use the bottom of a flat measuring cup to pack the crumbs down into a tight, even layer. Put the pan in the freezer for fifteen minutes to set while you work on the filling.
- In a cold bowl, beat the heavy whipping cream until it forms stiff peaks.
- In a separate large bowl, beat the softened cream cheese, powdered sugar, and vanilla extract. Blend until the mixture is completely smooth and looks like a thick frosting.
- Now you need to combine the two mixtures without losing the air you just whipped into the cream. Add about a third of the whipped cream to the cream cheese bowl and stir it in to lighten the base. Then, gently fold in the rest of the whipped cream using a rubber spatula. Use a slow, circular motion, lifting from the bottom to the top.
- Do not use an electric mixer for this part. If you are too aggressive, you will deflate the cream and your cheesecake bars
- Take your chilled crust out of the freezer and pour the cheesecake filling over the top. Use an offset spatula or the back of a large spoon to spread the cream into every corner.
- To give the bars a glossy, top-notch look, warm up the strawberry jam in a small bowl until it is liquid. Use a pastry brush or a spoon to lightly glaze the tops of the strawberries.