Confetti cookies are the ultimate celebration treat, bringing a burst of color and a soft, buttery texture to any dessert table.
These cookies are famous for their tender, melt-in-your-mouth centers and the playful crunch of rainbow sprinkles throughout every bite. They are a fantastic vegetarian-friendly dessert that looks just as fun as it tastes.
Ingredients
Yields: 24 cookies
- 1 cup unsalted butter, softened to room temperature
- 1 cup granulated sugar
- 1/2 cup light brown sugar, packed
- 1 large egg, room temperature
- 2 teaspoons vanilla extract
- 1/2 teaspoon almond extract
- 2 1/2 cups all-purpose flour
- 1 teaspoon baking soda
- 1/2 teaspoon cream of tartar
- 1/2 teaspoon sea salt
- 3/4 cup rainbow sprinkles (jimmies work best)
Why You Must Try This Confetti Cookies Recipe
You should try this recipe because it results in a cookie that is much more flavorful than the standard sugar cookies you find at the grocery store. The addition of almond extract gives these a “birthday cake” flavor that feels nostalgic and special for guests of all ages.
They are incredibly easy to make with basic pantry staples, meaning you can whip up a batch for a last-minute party or a school event without much stress. Most importantly, the texture is perfectly balanced between a chewy edge and a soft, pillowy middle, which is exactly what a high-quality homemade cookie should offer.
Cream the Butter
Start by placing your softened butter and both types of sugar into a large mixing bowl. Use an electric hand mixer or a stand mixer to beat the mixture on medium-high speed for about three to four minutes. You are looking for the butter and sugar to become very pale and fluffy.
This step is called “creaming,” and it is the secret to a light cookie. By beating the mixture well, you are incorporating tiny air bubbles that will help the cookies rise in the oven. If you skip this part, your cookies might end up dense and flat rather than soft and airy.
Add the Flavors
Once your butter and sugar are creamy, crack in your egg and add the vanilla and almond extracts. Beat the mixture again for about one minute until everything is fully combined. It is helpful to use a rubber spatula to scrape down the sides and the bottom of the bowl.
This ensures that the egg is evenly distributed and that no butter is sticking to the base. The almond extract is quite strong, so stick to the measured amount; it provides that signature bakery-style scent that makes people want to reach for a second cookie.
Whisk the Dry
In a separate medium-sized bowl, whisk together your all-purpose flour, baking soda, cream of tartar, and salt. The cream of tartar is an important addition here because it provides a slight tang and helps the cookies stay soft for days after they are baked.
Use a whisk to break up any lumps in the flour so that the leavening agents are perfectly distributed. This prevents one cookie from rising too much while another stays flat. Taking the time to mix the dry ingredients separately is a professional trick that guarantees a consistent batch every time.
Fold the Dough
Turn your mixer to the lowest possible speed and slowly add the flour mixture into the wet ingredients. Mix just until you no longer see any white streaks of flour. It is very important not to over-mix the dough at this stage.
If you beat the dough too much after the flour is added, you will develop the gluten, which leads to a tough and chewy cookie rather than a soft and tender one. Stop the mixer as soon as the dough looks uniform. The dough should be soft but thick enough to hold its shape when handled.
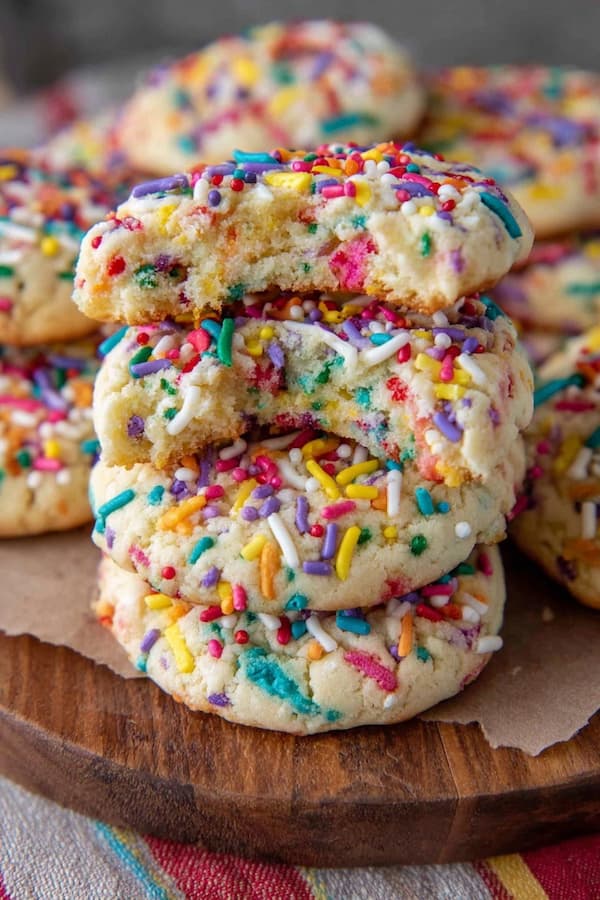
Toss the Sprinkles
Now it is time for the fun part. Pour your rainbow sprinkles into the bowl. Use a large spoon or a spatula to gently fold the sprinkles into the dough by hand. You want them to be spread out evenly so that every cookie gets a fair share of color.
Use “jimmies”—the long, rod-shaped sprinkles—rather than “nonpareils”—the tiny hard balls. Jimmies hold their color better during the heat of the baking process, whereas the tiny balls tend to bleed their dye into the dough, which can make your cookies look muddy or grey.
Chill the Dough
Cover your bowl with plastic wrap and place it in the refrigerator for at least thirty minutes. Chilling the dough is a vital step because it firms up the butter. If you put warm dough into the oven, the cookies will spread out too much and become very thin.
A chilled dough ensures that the cookies maintain a nice, thick profile and a soft center. If you are in a rush, you can skip this, but your cookies will look much more like the professional ones in the photos if you give them a little time to rest in the cold.
Scoop the Balls
Preheat your oven to 350°F and line two large baking sheets with parchment paper. Use a cookie scoop or a tablespoon to form the dough into balls about the size of a golf ball. Place them on the baking sheet, leaving about two inches of space between each one.
They will spread slightly, so you don’t want them to touch and merge into one giant cookie. If you want them to look extra festive, you can press a few additional sprinkles onto the top of each dough ball before they go into the oven.
Bake to Perfection
Slide the trays into the oven and bake for nine to eleven minutes. You are looking for the edges to be just barely set and a very light golden brown. The centers should still look slightly underbaked and soft.
This is the key to a great cookie; they will continue to firm up on the hot baking sheet once you take them out of the oven. If you wait until the centers look fully cooked, the cookies will be hard and crunchy once they cool down. Let them sit on the tray for five minutes before moving them to a wire rack.
Tips to Make it Perfect
- Room Temp Eggs: Use a room temperature egg so it emulsifies properly with the butter and sugar for a smooth batter.
- Measure Carefully: Use the spoon-and-level method for your flour to avoid adding too much, which makes cookies dry.
- Fresh Sprinkles: Use fresh sprinkles for the best color; older ones can sometimes lose their vibrance when heated.
- Pan Placement: Bake one sheet at a time in the center of the oven for the most even heat distribution.
Can I freeze the cookie dough for later?
Yes, this dough freezes beautifully. You can scoop the dough into balls and place them on a tray in the freezer for an hour until they are solid. Once frozen, transfer the balls to a zip-top bag and keep them for up to three months.
When you are ready for a fresh cookie, you can bake them straight from the freezer. Just add two extra minutes to the total baking time. This is a great way to always have a warm, homemade treat ready for unexpected guests.
How do I keep these cookies soft for several days?
The best way to keep confetti cookies soft is to store them in an airtight container at room temperature. A little-known trick is to place a single slice of white bread in the container with the cookies. The cookies will absorb the moisture from the bread, keeping them soft and fresh for up to five days.
Without the bread, they are still delicious, but they will slowly start to firm up after the third day. Avoid storing them in the refrigerator, as the cold air can actually dry out the starch in the cookies faster.
Confetti Cookies Recipe Card
- Prep Time: 15 minutes
- Chill Time: 30 minutes
- Cook Time: 10 minutes
- Total Time: 55 minutes
- Yields: 24 cookies
Cream the Butter
Beat the softened butter with granulated and brown sugars for about four minutes until the mixture is pale and fluffy. This step incorporates the air needed to give your cookies a light, bakery-style lift rather than a dense, flat texture.
Add the Flavors
Mix in the egg, vanilla, and almond extract. Scrape down the sides of the bowl to ensure the fats and flavorings are perfectly emulsified. The almond extract is the secret to that nostalgic “birthday cake” scent that makes these cookies irresistible.
Whisk the Dry
In a separate bowl, whisk the flour, baking soda, cream of tartar, and salt. Cream of tartar is essential here; it reacts with the baking soda to keep the centers soft and pillowy for several days after baking.
Fold the Dough
Slowly combine the dry ingredients into the wet batter on low speed. Stop as soon as the flour streaks disappear. Over-mixing at this stage will develop too much gluten, resulting in a tough cookie instead of a tender one.
Toss the Sprinkles
Gently fold in the rainbow “jimmies” by hand. Using the long, rod-shaped sprinkles ensures the colors stay bright and distinct within the dough, preventing the “bleeding” effect that often happens with tiny nonpareil spheres.
Chill and Bake
Chill the dough for 30 minutes to prevent over-spreading. Scoop golf-ball-sized portions onto a lined sheet and bake at 350°F for 9 to 11 minutes. Remove them while the centers still look slightly soft to ensure they stay chewy once cooled.