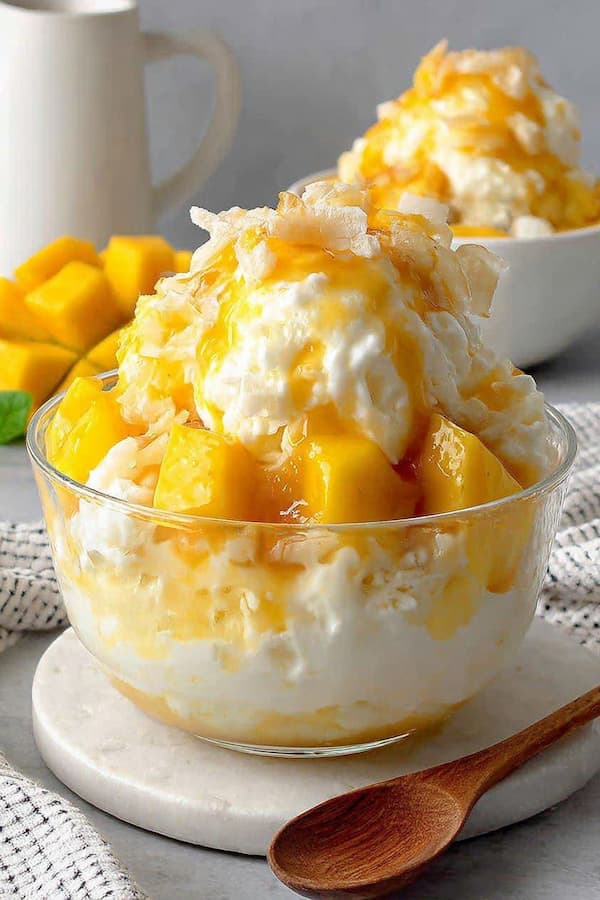
Mango bingsu is a refreshing Korean shaved ice dessert that features a snowy, milky base topped with heaps of sweet, sun-ripened mango.
This recipe replicates the professional-grade texture of a dessert cafe right in your own kitchen without needing an expensive industrial machine
It is a top-notch choice for hot summer days when you want a light, elegant treat that feels like eating a cold, sweet cloud.
Ingredients
Yields: 2 servings
- 2 cups whole milk
- 2 tablespoons sweetened condensed milk (for the base)
- 1/2 teaspoon vanilla extract
- 2 large ripe mangoes (honey or Ataulfo mangoes work best)
- 1/4 cup sweetened condensed milk (for drizzling)
- 1/2 cup mango purée or jam
- Fresh mint leaves for garnish
- Optional: One scoop of vanilla ice cream or a handful of almond slices
Why You Must Try This Mango Bingsu Recipe
You should try this recipe because it uses a simple freezing technique that creates a professional-grade “snow” texture without requiring a specialized bingsu machine. The secret is the addition of sweetened condensed milk directly into the milk base, which lowers the freezing point and ensures the ice is soft and flaky rather than hard and crunchy.
This is a top-notch dessert for anyone who loves fresh fruit because the creamy milk base acts as a blank canvas that lets the vibrant flavor of the mango truly shine.
Unlike traditional American shaved ice which uses water and flavored syrups, bingsu is rich and decadent because the ice itself is made of dairy. It is a fantastic way to impress guests with a dessert that looks like it came from a high-end Korean boutique but only takes a few minutes of active prep time.
Plus, since you are making it at home, you can pile on as much fruit as you want, ensuring a top-notch fruit-to-ice ratio that you rarely find in shops.
Mix the Base
Start by combining your whole milk, two tablespoons of sweetened condensed milk, and vanilla extract in a bowl. Whisk these together until the condensed milk is fully dissolved and the liquid is uniform.
This sweetened milk mixture is what gives the bingsu its professional-grade creaminess and prevents the ice from tasting bland.
If you want a richer version, you can replace half a cup of the milk with heavy cream, but for a standard, top-notch bingsu, whole milk provides the perfect light and snowy consistency.
Freeze the Block
Pour your milk mixture into a large, gallon-sized freezer bag. Squeeze out as much air as possible and seal the bag tightly.
Lay the bag flat on a baking sheet or a flat surface in your freezer. Freezing the milk in a thin, flat layer is a professional-level move because it allows the liquid to freeze quickly and makes it much easier to crush into fine flakes later.
Let the milk freeze for at least five to six hours, or until it is completely solid.
Cube the Fruit
While the milk base is freezing, prepare your mangoes. Peel the skin and cut the flesh away from the large flat pit in the center.
Slice the mango into small, uniform cubes about half an inch in size. Using a sharp knife is a professional tip to ensure clean edges on your fruit cubes, which makes the final presentation look much more top-notch.
Keep the cubes in a bowl in the refrigerator until you are ready to assemble; cold fruit is essential for keeping the shaved ice from melting too quickly.
Prep the Sauce
If you are not using store-bought mango jam, you can easily make a quick purée by blending half of one mango until smooth. This sauce provides a top-notch flavor boost that ties the milky ice and the fresh fruit together.
A professional-grade bingsu always has layers of flavor, so having a liquid fruit element is just as important as the solid chunks. Keep this sauce chilled alongside your mango cubes so every component of the dish is as cold as possible.
Crush the Snow
Take the frozen milk bag out of the freezer and let it sit on the counter for about two minutes. Use a rolling pin or a heavy spoon to smash and massage the bag while the milk is still inside.
Because of the sugar and fat in the milk, it will crumble into fine, powdery flakes rather than solid ice chunks. This is a top-notch way to achieve that famous “snow” texture without a machine. Once the ice feels soft and flaky, you are ready to build your dessert.
Build the Mound
Open the bag and pour half of the milk snow into a chilled bowl. Drizzle a small amount of mango purée over this first layer. Add the rest of the milk snow on top, shaping it into a tall, rounded mound with your spoon.
Building the bingsu in layers is a professional trick that ensures the person eating it doesn’t run out of flavor halfway through the bowl. Work quickly during this step, as the fine milk flakes are delicate and will begin to melt the moment they hit the room-temperate air.
Decorate the Top
Carefully arrange your chilled mango cubes all over the sides and top of the milk mound. Start from the bottom and work your way up to create a professional-grade “tiled” look. Pour the remaining sweetened condensed milk and mango purée over the top, letting it drip down between the fruit pieces.
If you want an extra top-notch finish, add a scoop of vanilla ice cream to the very peak and garnish with a few fresh mint leaves.
The bright green of the mint against the vibrant yellow mango creates a stunning, blog-worthy contrast.
Serve it Fast
Serve the mango bingsu immediately. Bingsu is meant to be eaten while the ice is still powdery and hasn’t yet turned back into liquid milk. Use a long spoon to scoop up a bit of the milk snow and a chunk of mango in every bite.
This dessert is a top-notch example of how simple ingredients can create something extraordinary when the textures are handled correctly.
It is the ultimate refreshing treat that is sure to become a staple in your summer recipe rotation.
How To Make This Mango Bingsu Better
- Coconut Twist: Replace the whole milk with full-fat coconut milk for a tropical, dairy-free version that has a professional-grade richness.
- Add Crunch: Sprinkle toasted almond slices or crushed graham crackers over the top to add a savory, crunchy contrast to the soft snow.
- Matcha Base: Whisk a teaspoon of high-quality matcha powder into the milk mixture before freezing for an earthy, green tea-flavored bingsu.
- Chewy Bits: Add a handful of small Korean rice cakes (mochi) to the top; the chewy texture is a traditional and top-notch addition to any bingsu.
Can I make the milk snow in a blender?
Yes, you can freeze the milk mixture in ice cube trays and then pulse the cubes in a high-speed blender. However, you must be careful not to over-blend, or the friction from the blades will melt the milk into a slushie instead of keeping it as flakes.
The “bag and smash” method is generally considered more top-notch for home cooks because it keeps the ice much colder and creates a texture that is closer to the traditional shaved snow found in professional Korean cafes.
How do I choose the best mangoes for bingsu?
For a professional-grade bingsu, you should look for mangoes that are fully ripe but still slightly firm to the touch. Honey mangoes (also known as Ataulfo) are the top-notch choice because they have a very small pit, no stringy fibers, and an incredibly sweet, buttery flavor.
If you can only find traditional red and green mangoes, make sure they have a strong, sweet scent at the stem end, as this indicates they are ready to be used and will provide the best flavor for your dessert.

Ingredients
Method
- Whisk the whole milk, two tablespoons of sweetened condensed milk, and vanilla extract together in a pitcher. Ensure the condensed milk is fully dissolved into the liquid.
- Pour the mixture into a large, gallon-sized freezer bag. Lay it completely flat on a tray in your freezer. Freezing the milk in a thin sheet is a professional-grade move that allows it to freeze quickly and makes it much easier to break down into fine, powdery flakes later.
- While the base freezes, peel and dice your mangoes into uniform cubes. Using a sharp knife is a professional tip to get clean edges that make the dessert look world-class. Place the cubes in a bowl and chill them in the refrigerator.
- Blend a few chunks of mango into a smooth purée or use a high-quality mango jam. Thin it out with a teaspoon of water if needed so it is easy to drizzle. Keep this sauce chilled alongside your mango cubes until you are ready to serve.
- Take the frozen bag out of the freezer and let it sit for two minutes. Use a heavy spoon or rolling pin to smash the bag until the milk turns into fine, white flakes.
- Pour half of the snow into a chilled bowl and add a drizzle of mango sauce. Top with the remaining snow, shaping it into a tall mound. Arrange the mango cubes around the sides and pour the extra condensed milk and mango purée over the top. Garnish with a mint leaf and serve immediately.
Notes
- Coconut Twist: Replace the whole milk with full-fat coconut milk for a tropical, dairy-free version that has a professional-grade richness.
- Add Crunch: Sprinkle toasted almond slices or crushed graham crackers over the top to add a savory, crunchy contrast to the soft snow.
- Matcha Base: Whisk a teaspoon of high-quality matcha powder into the milk mixture before freezing for an earthy, green tea-flavored bingsu.
- Chewy Bits: Add a handful of small Korean rice cakes (mochi) to the top; the chewy texture is a traditional and top-notch addition to any bingsu.