Homemade pie crust is one of those things that seems tricky until you make it once — then you realize how simple and satisfying it really is. There’s something deeply comforting about bringing together flour, butter, and water into a flaky, golden crust that makes every pie feel like home.
This recipe is exactly how I’ve been making it for years — easy, reliable, and buttery enough to impress anyone at the table.
A Few Words Before You Start
When I first started baking, I used to buy pre-made crusts thinking it would save me time. But once I learned how to make a proper homemade pie crust, I never looked back.
There’s no store-bought version that compares to the crisp, flaky layers of real butter and love that come from your own kitchen. It’s easier than most people think, and you don’t need fancy tools — just a bowl, a fork, and a bit of patience.
Ingredients
Makes 1 Double Crust or 2 Single Crusts
- 2 ½ cups all-purpose flour
- 1 cup (2 sticks) cold unsalted butter, cut into cubes
- 1 teaspoon salt
- 1 tablespoon sugar (optional, for sweet pies)
- 6 to 8 tablespoons ice-cold water
Keep It Cold
The secret to a flaky pie crust is cold butter. Don’t let it soften — keep it straight from the fridge. The tiny cold bits of butter melt in the oven and create pockets of air that give your crust that beautiful, crisp texture. You can even chill your bowl and flour if your kitchen is warm.
Mix the Dry Ingredients
In a large mixing bowl, combine the flour, salt, and sugar. Give it a quick stir with a fork or whisk to blend everything evenly. This ensures your crust won’t have salty or sweet spots later.
Cut in the Butter
Add the cold butter cubes into the flour. Using a pastry cutter, fork, or even your hands (if you work quickly), press the butter into the flour until it looks like coarse crumbs. You want some pieces the size of peas — don’t overdo it. Those bits are what make your crust flaky.
If you’re using your hands, dip your fingertips in cold water occasionally to keep them cool.
Add Ice Water Slowly
Drizzle in the ice-cold water, one tablespoon at a time, stirring gently with a fork after each addition. The dough should just start to come together. You don’t want it wet or sticky. Stop adding water once it holds together when you pinch a bit between your fingers.
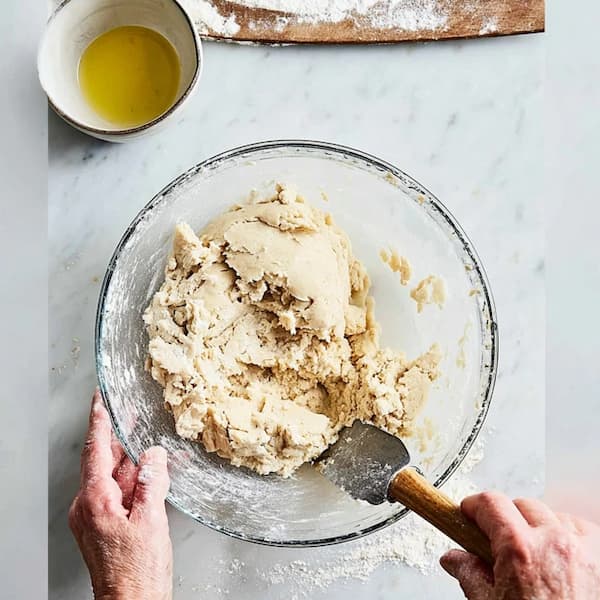
If you see dry crumbs at the bottom, press them in gently — but don’t overmix. Too much mixing develops gluten and makes the crust tough.
Shape and Chill
Gather the dough into a ball, then divide it into two equal parts. Flatten each half into a round disk about an inch thick. Wrap them tightly in plastic wrap and refrigerate for at least 1 hour (or up to 2 days).

This chilling step lets the gluten relax and the butter firm up again. It’s what keeps the crust from shrinking while baking.
Roll It Out
Lightly flour your countertop and rolling pin. Take one dough disk from the fridge and let it sit for 5–10 minutes so it’s easier to roll. Start rolling from the center outward, turning the dough a quarter turn after every few rolls to keep it even.
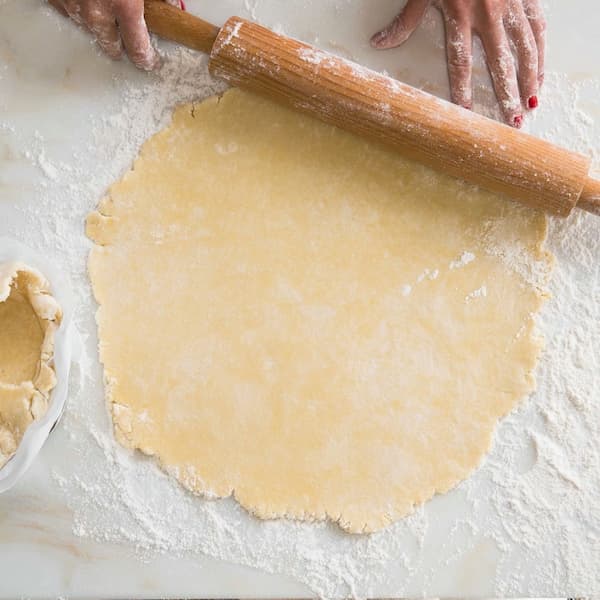
You’re aiming for a circle about 12 inches wide and ⅛ inch thick — perfect for a 9-inch pie dish.
To transfer it, gently roll the dough onto your rolling pin, lift it over the pie dish, and unroll it into place.
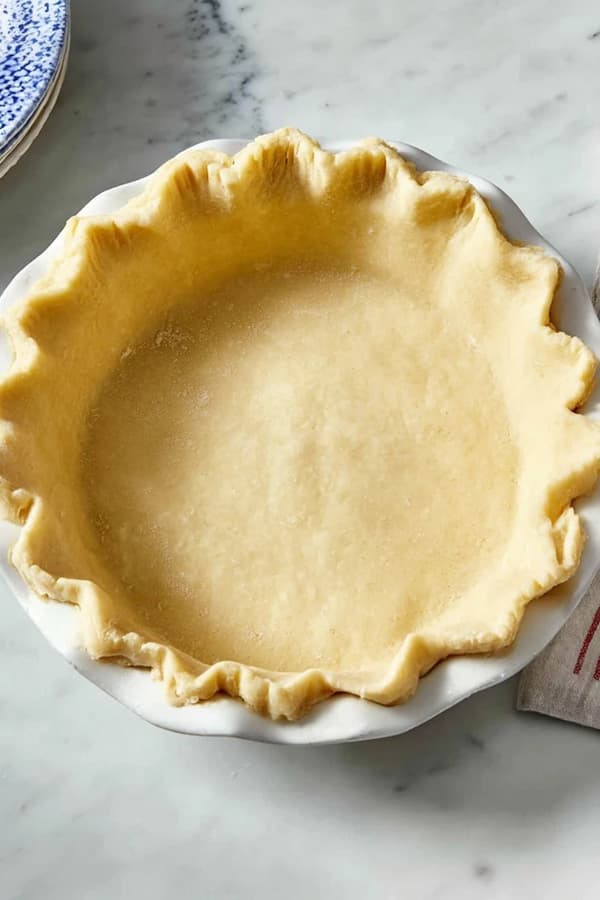
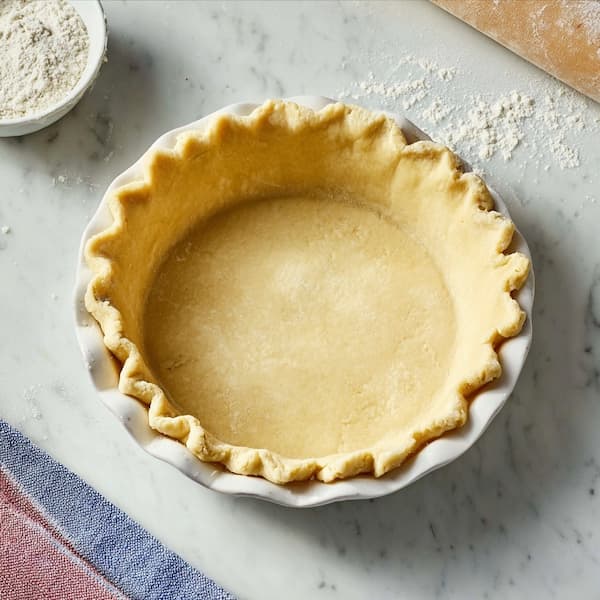
Trim and Shape
Use kitchen scissors or a knife to trim any excess dough hanging over the edges, leaving about 1 inch. Fold the edges under themselves and crimp with your fingers or a fork to make a nice pattern.
If you’re making a double crust pie, fill your pie first, then roll out the second dough disk, place it on top, and seal the edges by pinching them together. Don’t forget to cut small slits on the top crust for steam to escape.
Chill Before Baking
Once shaped, pop the pie back into the fridge for 15–20 minutes. This final chill makes sure the butter stays solid before it hits the hot oven — giving you those lovely, flaky layers.
Bake It Right
For a baked crust (for cream or cold pies), preheat the oven to 425°F (220°C). Line the crust with parchment paper and fill it with pie weights, dry beans, or rice. Bake for 15 minutes, then remove the weights and bake another 10–12 minutes until golden.
For a filled pie (like apple or pumpkin), follow your pie recipe’s instructions, usually around 375–400°F (190–200°C) for 45–60 minutes, depending on the filling.
Cool and Enjoy
Let the baked crust cool completely before filling it. You’ll know you nailed it when you hear that gentle crisp crack as you cut into the first slice. The flavor will be buttery, light, and just a little salty — exactly what a real pie crust should be.
My Early Lessons
I remember one of my first pie crusts was a complete disaster — warm butter, overworked dough, and no chilling time. It came out dense and tough. But that’s the beauty of homemade baking — every mistake teaches you something. The next time, I kept everything cold, touched the dough less, and suddenly, it worked.
If you’re nervous about rolling or crimping, don’t be. Imperfect crusts are still delicious — and those rustic edges tell a story that store-bought pies never will.
Storage Tips
You can make this dough ahead and freeze it for up to 3 months. Just wrap it tightly in plastic wrap and place in a freezer bag. Thaw overnight in the fridge before using to make your favorite pie, such as pecan pie or apple pie.
If you want to prep it the day before, keep it chilled in the fridge, then roll it out when ready. Once baked, the crust stays crisp for up to 3 days if stored covered at room temperature.
Tools You’ll Need
- Mixing bowl
- Pastry cutter or fork
- Rolling pin
- Plastic wrap
- 9-inch pie dish
- Parchment paper and pie weights
Related Questions
1. How Do I Fix Cracked Dough?
If your dough cracks while rolling, don’t worry. Press it back together gently or sprinkle a few drops of cold water and smooth it out with your fingers. It won’t affect the final texture once baked.
2. Can I Use Shortening Instead of Butter?
Yes, you can use shortening, or even a mix of shortening and butter. Shortening makes a softer, more tender crust, while butter gives flavor and flakiness. Many bakers use half of each for balance.
Final Thoughts
Homemade pie crust isn’t about perfection — it’s about texture, care, and patience. Once you master this simple recipe, you’ll never buy one again. Whether it’s for a holiday pumpkin pie or a casual summer fruit tart, this crust is the quiet hero behind every great slice.
Ingredients
Method
- The secret to a flaky pie crust is cold butter. Don’t let it soften — keep it straight from the fridge.
- In a large mixing bowl, combine the flour, salt, and sugar. Give it a quick stir with a fork or whisk to blend everything evenly.
- Add the cold butter cubes into the flour. Using a pastry cutter, fork, or even your hands (if you work quickly), press the butter into the flour until it looks like coarse crumbs.
- Drizzle in the ice-cold water, one tablespoon at a time, stirring gently with a fork after each addition.
- The dough should just start to come together. If you see dry crumbs at the bottom, press them in gently — but don’t overmix.
- Gather the dough into a ball, then divide it into two equal parts.
- Flatten each half into a round disk about an inch thick. Wrap them tightly in plastic wrap and refrigerate for at least 1 hour (or up to 2 days).
- Lightly flour your countertop and rolling pin. Take one dough disk from the fridge and let it sit for 5–10 minutes so it’s easier to roll.
- You’re aiming for a circle about 12 inches wide and ⅛ inch thick — perfect for a 9-inch pie dish.
- To transfer it, gently roll the dough onto your rolling pin, lift it over the pie dish, and unroll it into place.
- Use kitchen scissors or a knife to trim any excess dough hanging over the edges, leaving about 1 inch.
- Fold the edges under themselves and crimp with your fingers or a fork to make a nice pattern.
- If you’re making a double crust pie, fill your pie first, then roll out the second dough disk, place it on top, and seal the edges by pinching them together.
- Once shaped, pop the pie back into the fridge for 15–20 minutes.
- For a baked crust (for cream or cold pies), preheat the oven to 425°F (220°C). Line the crust with parchment paper and fill it with pie weights, dry beans, or rice. Bake for 15 minutes, then remove the weights and bake another 10–12 minutes until golden.