When I was growing up, whipped cream always felt like something magical. It seemed like only bakeries knew how to make it that light and fluffy. I used to buy the canned version for every dessert until one day I tried making it myself.
It took less than five minutes, and the taste was so much better — soft, rich, and fresh. Once you make whipped cream at home, you’ll never want the store-bought kind again.
What You’ll Need
Homemade whipped cream starts with only a few ingredients, but how you handle them makes all the difference. You’ll need:
- 1 cup (240 ml) heavy whipping cream or heavy cream
- 1-2 tablespoons of sugar (powdered sugar or granulated)
- 1/2 teaspoons vanilla extract (optional)
- a cold bowl and whisk or mixer
That’s it. The secret is temperature. Cold cream whips faster and holds its shape longer. Before starting, place your bowl and whisk in the fridge for ten minutes. It helps the cream stay firm while you whip.
Chill, Measure, and Start Slow
Pour the cold cream into your chilled bowl. If you want lightly sweetened whipped cream, add one or two tablespoons of sugar for every cup of cream. I usually add a drop of vanilla too because it gives that soft, creamy flavor that reminds me of bakery desserts.
Begin whisking on low speed if you’re using a hand mixer or stand mixer. If you’re using a regular whisk, take your time and start with small circles. As you whisk, tiny air bubbles form inside the cream. That’s what gives it volume and that soft, cloud-like texture.
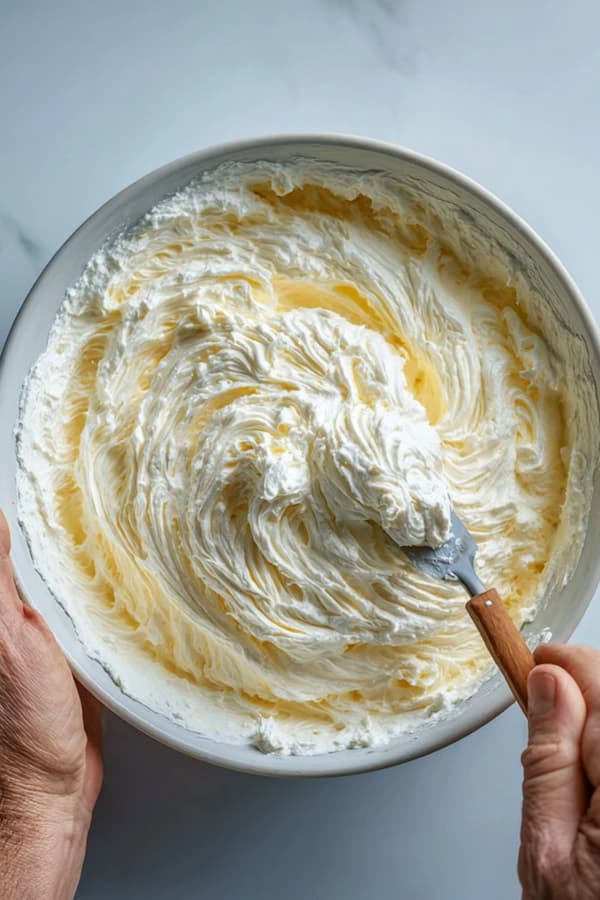
Once the cream begins to thicken, you can increase the speed. You’ll notice lines forming in the cream — that’s how you know you’re close.

Know When to Stop
This is the part where most people go wrong. Whipped cream can go from perfect to over-whipped in seconds. I still remember the first time I did that — my cream turned grainy and started separating. It looked more like butter than topping.
The goal is to reach soft or medium peaks, depending on how you plan to use it. When you lift the whisk, the cream should hold its shape but still look smooth. It should not clump or look dry. If you want a firmer texture for frosting cupcakes or piping onto desserts, go a little longer until it holds stiff peaks — but don’t overdo it.

If you accidentally over-whip it, don’t worry. Add a tablespoon or two of fresh cream and gently fold it in by hand. It usually softens the texture again.
How to Flavor Your Whipped Cream
Once you master the basic recipe, it’s easy to customize it. A few of my favorite additions are:
- a spoon of cocoa powder for chocolate whipped cream
- maple syrup instead of sugar for a cozy, fall flavor
- almond or peppermint extract for holiday desserts
- lemon zest for fresh fruit tarts
It’s small touches like these that make desserts feel special without extra work. You can match your whipped cream flavor to the dessert you’re serving — chocolate for brownies, lemon for cakes, vanilla for fruit pies.
How to Use Whipped Cream
Whipped cream can turn any dessert into something elegant. I love adding it to warm brownies, pancakes, or a slice of apple pie. It’s perfect for topping mousse, trifles, or fresh strawberries.

If you’re making a layer cake, you can spread whipped cream between the layers. It gives the cake a light texture and keeps it moist. For frosting, use stiff-peak whipped cream and refrigerate the cake until serving. It’s soft, simple, and beautiful.
Lessons from My Early Tries
When I first started making whipped cream, I thought it was just about beating air into cream. Over time, I learned small things that make it more consistent:
- Always chill the bowl, whisk, and cream
- Add sugar gradually so it blends smoothly
- Stop whipping as soon as peaks hold their shape
- Don’t try to fix over-whipped cream with more mixing — add fresh cream instead.
- Use it right after making it for the best texture
These small habits turn a simple process into something reliable. Once you get a feel for it, you’ll know the texture just by the look and sound of the whisk.
My blog also includes a buttermilk variation, as well as the chocolate frosting that are both worth checking out.
How to Store Whipped Cream
Fresh whipped cream tastes best the day it’s made, but you can store it if you plan ahead.
Transfer it into an airtight container and keep it in the fridge. It usually lasts up to two days before it starts to lose volume. If it softens, whisk it gently for a few seconds to bring it back.
For longer storage, you can freeze small scoops of whipped cream on parchment paper. Once they’re frozen, place them in a container and use them later for topping hot cocoa or pies. They keep for up to a month and still taste fresh
Can I make whipped cream without a mixer?
Yes. You can use a whisk and a little patience. It takes more effort, but the texture is light and natural. A chilled metal bowl helps the process go faster.
Can I use milk instead of cream?
No, milk doesn’t have enough fat to hold air. You need heavy cream or heavy whipping cream because it contains at least 30% fat, which traps air bubbles and keeps them stable.
How can I make it dairy-free?
Use coconut cream from a chilled can of coconut milk. Scoop the thick part from the top and whip it the same way. It’s slightly sweeter and works beautifully for vegan desserts.What can I do if it turns into butter?
If you accidentally whip too long and the cream starts forming lumps, you’ve gone past the point of whipped cream. Save it — you can use it as a quick homemade butter for toast.
Fresh whipped cream is one of those small kitchen skills that makes a big difference. It’s quick, satisfying, and turns ordinary desserts into something memorable. Once you do it by hand and taste that fresh, airy texture, you’ll never look at the store cans the same way again.
Ingredients
Method
- Pour the cold cream into your chilled bowl. If you want lightly sweetened whipped cream, add one or two tablespoons of sugar for every cup of cream.v
- Begin whisking on low speed if you’re using a hand mixer or stand mixer. If you’re using a regular whisk, take your time and start with small circles.
- Once the cream begins to thicken, you can increase the speed. You’ll notice lines forming in the cream — that’s how you know you’re close.
- The goal is to reach soft or medium peaks, depending on how you plan to use it. When you lift the whisk, the cream should hold its shape but still look smooth.
- If you want a firmer texture for frosting cupcakes or piping onto desserts, go a little longer until it holds stiff peaks — but don’t overdo it.
- If you accidentally over-whip it, don’t worry. Add a tablespoon or two of fresh cream and gently fold it in by hand. It usually softens the texture again.
Notes
- Always chill the bowl, whisk, and cream
- Add sugar gradually so it blends smoothly
- Stop whipping as soon as peaks hold their shape
- Don’t try to fix over-whipped cream with more mixing — add fresh cream instead.
- Use it right after making it for the best texture