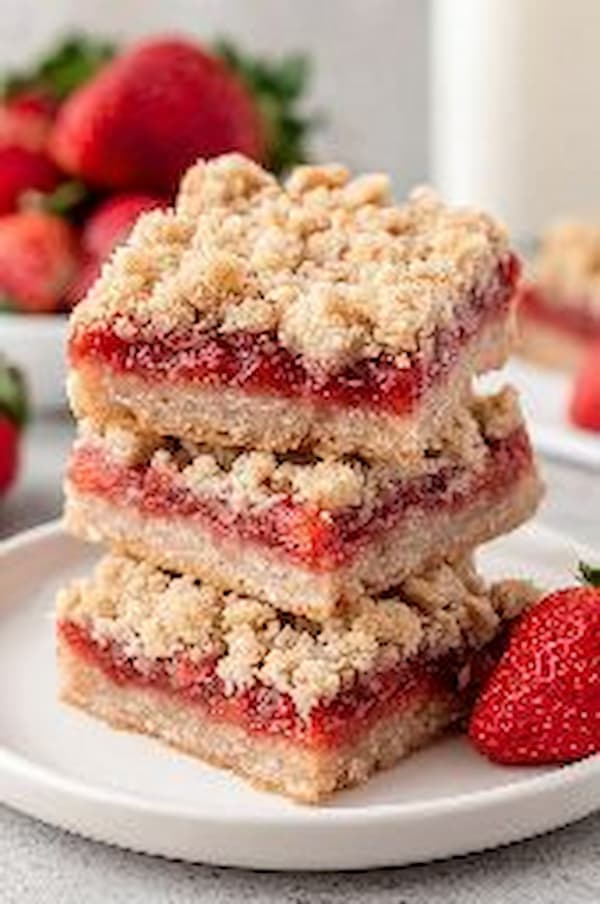
Strawberry oatmeal bars are the ultimate jammy treat that works perfectly for a quick breakfast or a sweet afternoon snack.
These bars feature a buttery, crumbly crust made from hearty oats and a thick layer of fresh, glowing strawberries in the center. It is a fantastic high-protein vegetarian dessert option that is much healthier than store-bought granola bars but tastes twice as good.
Ingredients
Yields: 16 bars
- 1 ½ cups all-purpose flour
- 1 ½ cups old-fashioned rolled oats
- ¾ cup light brown sugar, packed
- ½ teaspoon baking soda
- ¼ teaspoon sea salt
- ¾ cup unsalted butter, melted and cooled
- 1 teaspoon vanilla extract
- 2 cups fresh strawberries, diced small
- 1 tablespoon granulated sugar
- 1 tablespoon cornstarch
- 1 teaspoon lemon juice
Why You Must Try This Strawberry Oatmeal Bars Recipe
You should make this recipe because it is much more satisfying than anything you can buy in a box at the store. The combination of the buttery, toasted oats and the warm, jammy strawberry center creates a texture that is both chewy and crisp. It is a great way to use up summer berries before they go soft, and the recipe is easy enough for kids to help with. Plus, these bars pack well in a lunchbox or a gym bag, giving you a steady source of energy throughout the day without a heavy sugar crash.
Prep the Pan
Before you start mixing your dough, get your baking environment ready. Preheat your oven to 350°F so it is hot and steady by the time your bars are ready to go in. Take an 8×8 inch square baking pan and line it with parchment paper, leaving a little bit of a “slingshot” overhang on two sides.
This overhang is a professional trick that allows you to lift the entire block of bars out of the pan once they have cooled. If you do not have parchment paper, grease the pan very well with butter or a non-stick spray to ensure the sugary strawberry layer does not stick to the edges.
Pulse the Crumble
In a large mixing bowl, combine your all-purpose flour, rolled oats, brown sugar, baking soda, and salt. Use a fork or a pastry cutter to stir these dry ingredients until the brown sugar lumps are broken down and everything is uniform.
Pour in your melted butter and vanilla extract. Stir the mixture until it looks like wet sand and starts to form small clumps. This versatile mixture will act as both your bottom crust and your crunchy top layer, saving you the trouble of making two separate doughs for one recipe.
Press the Base
Take about two-thirds of your oat mixture and dump it into the bottom of your prepared baking pan. Use the bottom of a flat measuring cup or your clean fingers to press the crumbs down firmly. You want to create a solid, even layer that reaches all the way into the corners of the pan.
Pressing down hard is the secret to a bar that holds together when you bite into it rather than crumbling into a mess. If the base is too loose, the strawberry juice will seep through and make the bottom of the bars soggy.
Chop the Fruit
Wash your fresh strawberries and remove the green tops. Slice the berries into small, even pieces about the size of a blueberry. Place the diced fruit into a medium bowl and toss them with the granulated sugar, cornstarch, and lemon juice.
The cornstarch is a key ingredient because it thickens the juices that the strawberries release in the oven, turning them into a thick, jam-like consistency. The lemon juice keeps the color of the fruit bright and provides a tiny bit of tartness to balance the sweet brown sugar in the crust.
Layer the Jam
Spread the strawberry mixture evenly over the top of your pressed oat base. Use a spoon to push the fruit pieces around until the entire surface is covered. You want a thick layer of fruit so that every single bar has a bright, jammy center.
If you have a few extra berries, feel free to toss them in, but try not to make the fruit layer so thick that it prevents the top crumble from sticking. This middle layer is what provides the beautiful red contrast you see when the bars are stacked.
Scatter the Top
Take the remaining third of your oat crumble and sprinkle it over the top of the strawberries. Do not press this layer down; let it stay loose and chunky. You want some of the red fruit to peek through the gaps in the oats, which creates a rustic and appetizing look once baked.
The loose crumbs will toast up in the oven, providing a satisfying crunch that contrasts with the soft, cooked fruit below. This double-layered approach gives you the perfect balance of textures in every bite.
Bake to Gold
Slide your pan into the center rack of the oven. Bake for thirty to thirty-five minutes. You are looking for the edges of the crust to turn a dark golden brown and for the strawberry filling to be bubbling slightly around the sides.
The smell of toasted oats and warm berries will fill your house as it finishes. If the top looks like it is browning too quickly, you can loosely cover the pan with a piece of foil for the last five minutes, but usually, the thirty-minute mark is the sweet spot for a perfect crunch.
Cool for Cleanly
This is the hardest part of the entire process: waiting. You must let the pan cool completely on a wire rack for at least one to two hours. If you try to cut the bars while they are still warm, the strawberry layer will be too liquid, and the bars will fall apart.
As they cool, the cornstarch sets and the butter in the crust firms up. For the cleanest squares, you can even pop the cooled pan into the fridge for thirty minutes before lifting the parchment paper out and slicing them with a sharp knife.
Tips to Make it Perfect
- Use Old-Fashioned Oats: Avoid quick oats or instant oats, as they lack the structure needed for a sturdy, crunchy crust.
- Cold Butter Option: If you prefer a more shortbread-like crust, use cold cubed butter and work it into the flour with your fingers until crumbly.
- Fresh is Best: While frozen berries work, they release much more moisture. If using frozen, add an extra teaspoon of cornstarch to compensate.
- Firm Pressing: Really pack down that bottom layer; a firm base is the difference between a bar and a pile of granola.
Can I use different fruits for the filling?
You can easily swap strawberries for blueberries, raspberries, or even chopped peaches. Blueberries are especially good because they hold their round shape well during baking.
If you use a fruit that is very sweet, like ripe peaches, you might want to reduce the granulated sugar in the filling by half. The method remains exactly the same: toss with cornstarch and lemon juice, layer them on the base, and bake until bubbly.
How should I store these bars to keep them crunchy?
These bars should be stored in an airtight container. If you are going to eat them within two days, they can sit on the counter at room temperature. If you want them to last longer, keep them in the refrigerator for up to five days.
To prevent the oat crumble from becoming soft, you can place a piece of parchment paper between layers of bars. They also freeze beautifully; just wrap individual squares in plastic wrap and store them in a freezer bag for up to three months.
Method
- Before you start mixing your dough, get your baking environment ready. Preheat your oven to 350°F so it is hot and steady by the time your bars are ready to go in.
- In a large mixing bowl, combine your all-purpose flour, rolled oats, brown sugar, baking soda, and salt. Use a fork or a pastry cutter to stir these dry ingredients until the brown sugar lumps are broken down and everything is uniform.
- Pour in your melted butter and vanilla extract. Stir the mixture until it looks like wet sand and starts to form small clumps.
- Take about two-thirds of your oat mixture and dump it into the bottom of your prepared baking pan. Use the bottom of a flat measuring cup or your clean fingers to press the crumbs down firmly.
- Wash your fresh strawberries and remove the green tops. Slice the berries into small, even pieces about the size of a blueberry. Place the diced fruit into a medium bowl and toss them with the granulated sugar, cornstarch, and lemon juice.
- Spread the strawberry mixture evenly over the top of your pressed oat base. Use a spoon to push the fruit pieces around until the entire surface is covered. If you have a few extra berries, feel free to toss them in, but try not to make the fruit layer so thick that it prevents the top crumble from sticking.
- Take the remaining third of your oat crumble and sprinkle it over the top of the strawberries. Do not press this layer down; let it stay loose and chunky. Slide your pan into the center rack of the oven. Bake for thirty to thirty-five minutes.
- You must let the pan cool completely on a wire rack for at least one to two hours. If you try to cut the bars while they are still warm, the strawberry layer will be too liquid, and the bars will fall apart.